
Backups: Setting up encrypted rclone & gsuite in Unraid
This will likely be an evolving guide. Please post comments in the thread on our forums and I will update this post as time goes on to make it more complete.
Updated Feb 23, 2023 to include alternate method to get oauth tokens, suggest creating your own client key/secret.
Cloud Storage
Google Suite is cost-effective for large data storage needs (>1-2TB)
Dropbox, GDrive, OneDrive are cost-effective for smaller storage needs (<1-2TB)
There are numerous providers out there. I won’t delve too much into the comparisons because you can find simple comparisons all over the webs (image below from this link). There are two major components to pay attention to with cloud storage pricing: monthly storage cost for data at rest and cost for getting your data out (egress). While some providers make it cheap to store data, pulling data out can really become expensive.
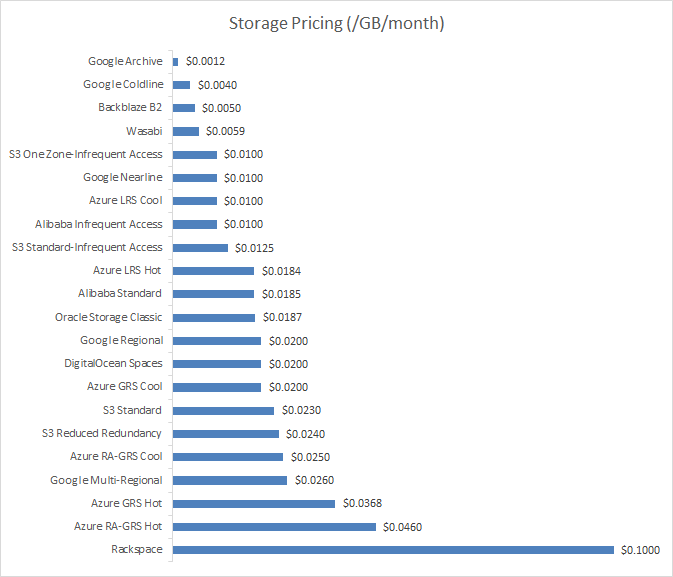
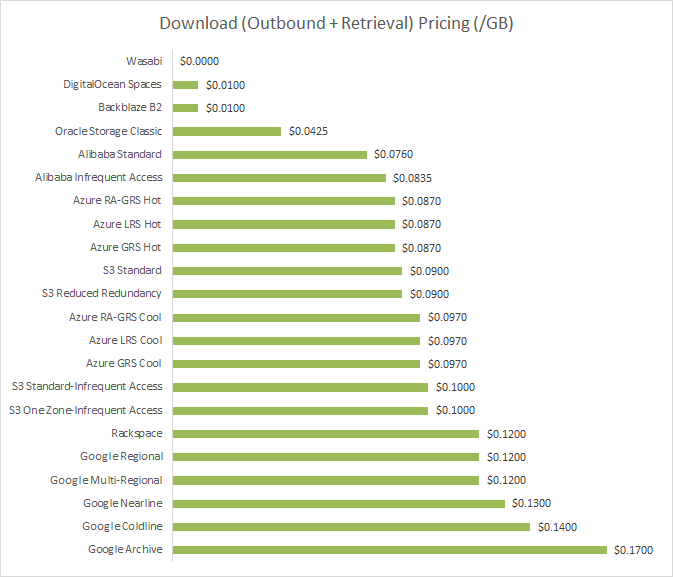
If you don’t have a lot to store and you’re <1-2TB, you can look at Google Drive, Dropbox, OneDrive, and similar consumer-grade solutions. If you’re >1-2TB, you’re starting to head into business-grade and may want to look at Wasabi, Amazon S3, Backblaze B2, etc. If you’re >10TB the equation starts to shift even more and you really want to pay attention to egress costs and monthly storage costs.
We recommend Google Suite as it’s business-grade, cost-effective as you scale up, and very feature-rich. Picking a data storage provider that will scale with you is pretty critical as egress costs aren’t cheap so moving your data around later on, when it’s grown large, can be costly both in time and dollars.
Setting up GSuite
You’ll need to do this before we continue with the setup guide.
- $12/mo/user includes 1TB of storage per user. Once you hit 5 users the storage quota is unlimited. As of writing this, Google does not seem to be enforcing the 1TB limit and there are numerous reports of a single account being able to upload multiple TB of data.
- A worthwhile caveat is that all GSuite accounts are limited to 750GB/day of upload (ingress) and 10TB/day of download (egress). There is no known limit on getting your data out (egress).
- GSuite requires your own custom domain name when signing up. You can buy one through Google or use another registrar; I personally prefer NameCheap as they are cheap, reliable, and include WHOIS privacy free of charge.
rclone (software)
rclone is a great file transferring tool that is open source and actively developed by a dozen+ folks. Their forums are active and helpful. rclone takes files from one location and can either sync or copy from SourceA to DestinationB. The difference between the two is that sync will ensure files added or removed on SourceA will be reflected on DestinationB while copy will take new files from SourceA and copy them over to DestinationB. Pretty simple. That’s all it does, in a nutshell, and it does it very well with tons of configurations if you want to get into the weeds.
rclone is not a versioning tool designed to backup and capture deltas as files change. For that, you can look at Duplicacy, Duplicati, Arq, and numerous others. When it comes to media files and things that don’t change much, rclone shines.
Setup Guide
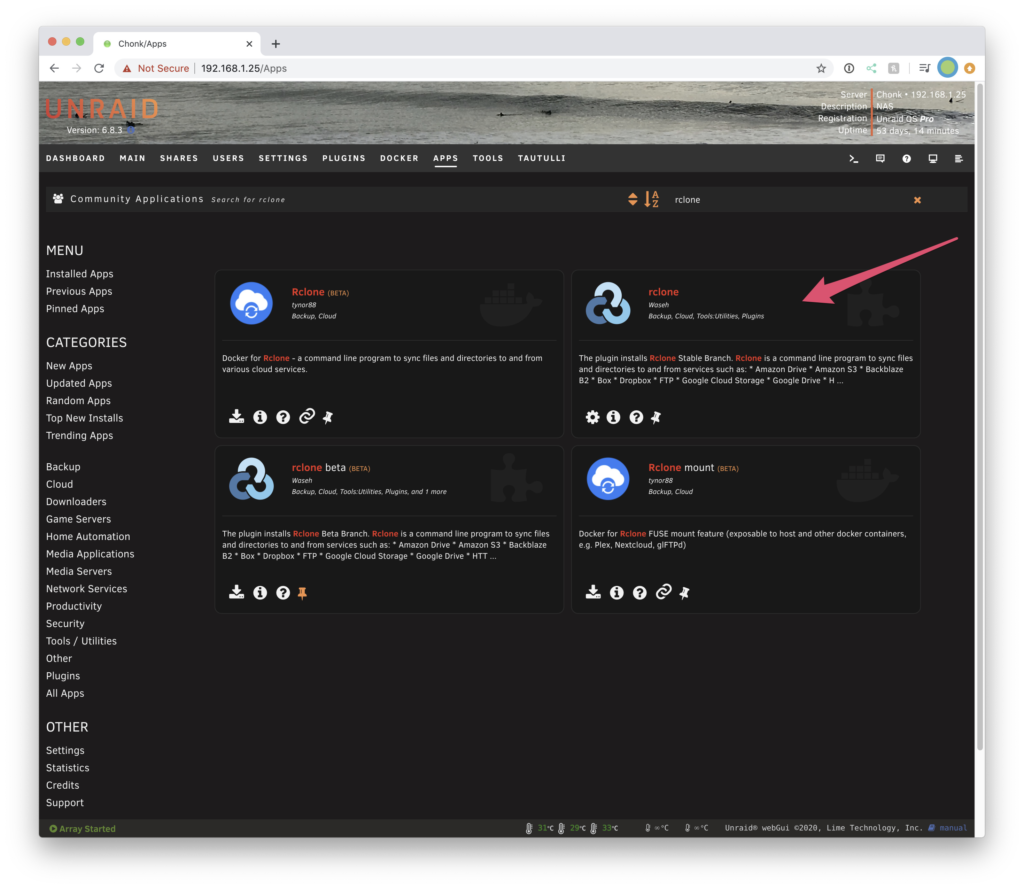
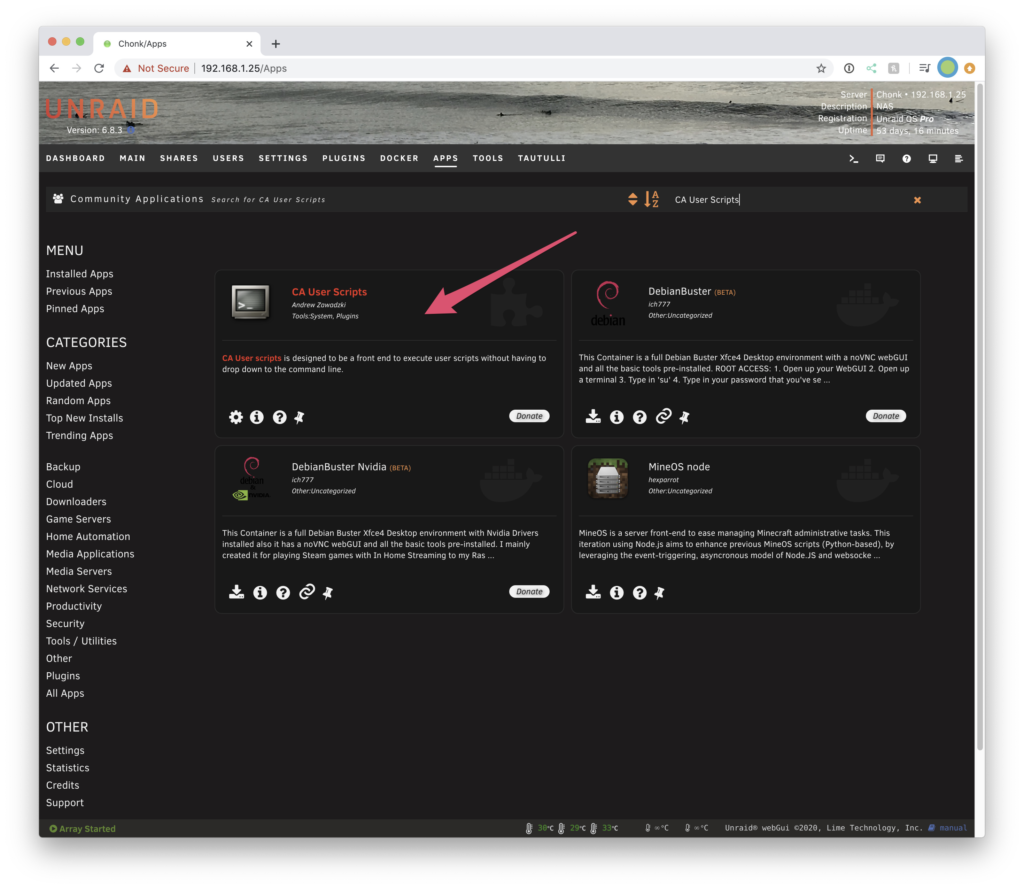
We will assume you have Community Apps installed, if not, go and install it.
Install rclone & UserScripts
In Community Apps, find and install rclone and UserScripts:
Configure rclone
Setup Remotes
Pop into terminal in Unraid. It is worth noting that you can do this entire setup on your laptop, desktop, etc and not in Unraid if you do not want to boot Unraid into GUI mode to accept GDrive OAuth permissions. Once you complete the authentication process, you can copy over your rclone.config to your Unraid machine. To do things that way, install rclone using Homebrew or whatever package manager or method you prefer on your daily driver machine. And follow these steps. You can find your rclone config by using the command rclone config file.
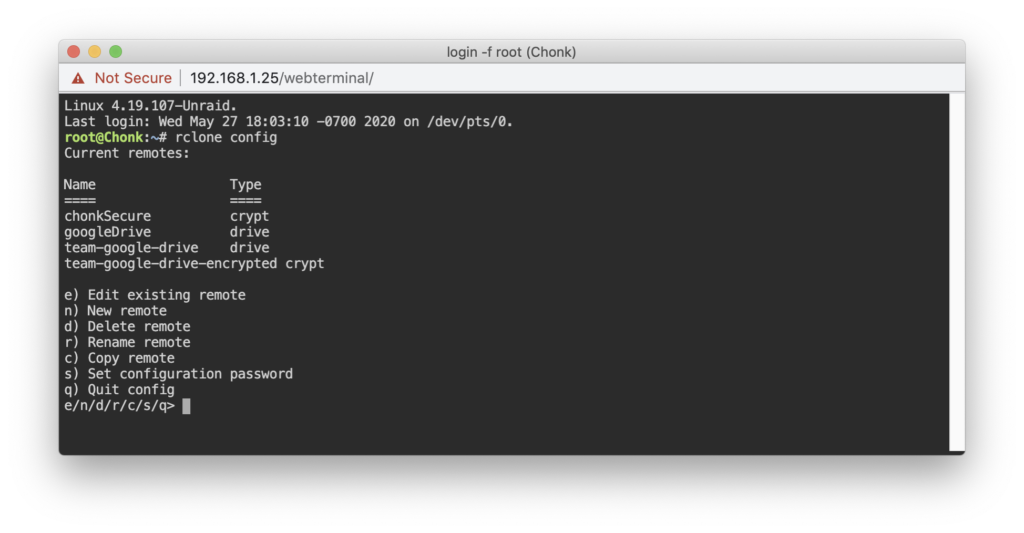
rclone configFrom the configuration menu, we’re going to be able to see our existing remote destinations as well as set up new ones. You’ll see in the screenshot above that some of the Type of remotes are “crypt” or “drive,” this simply means what it looks like in that some of the remotes are encrypted.
Press n to create a new remote and you’ll be prompted with the options for various supported destinations:
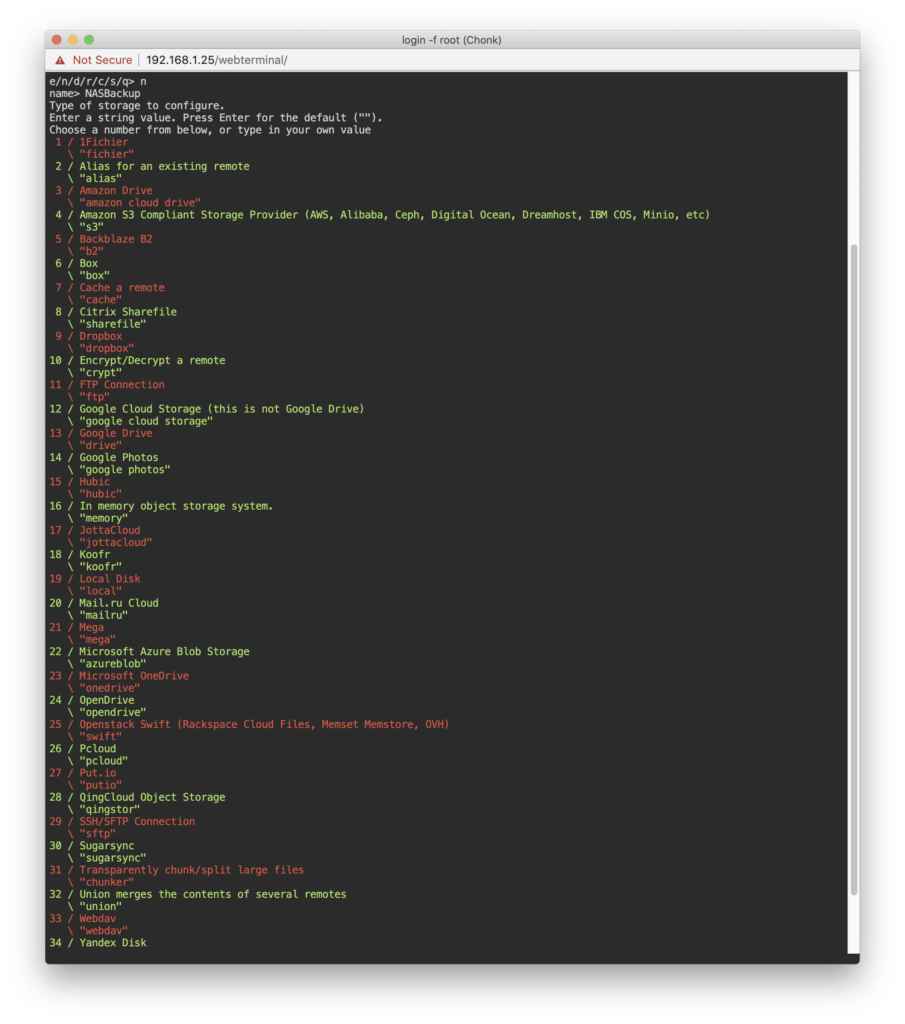
As of this guide, 13 is the option for Google Drive (which is what we want, on top of GSuite):
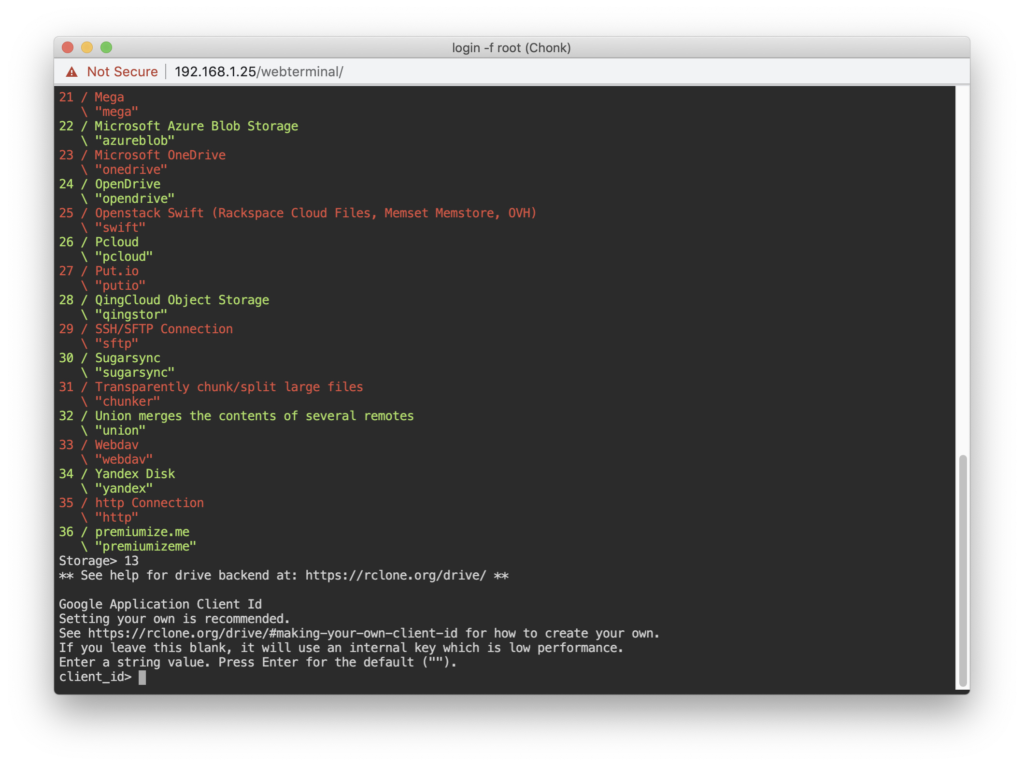
You should go and create a create your own Client ID and enter those into the following prompts:
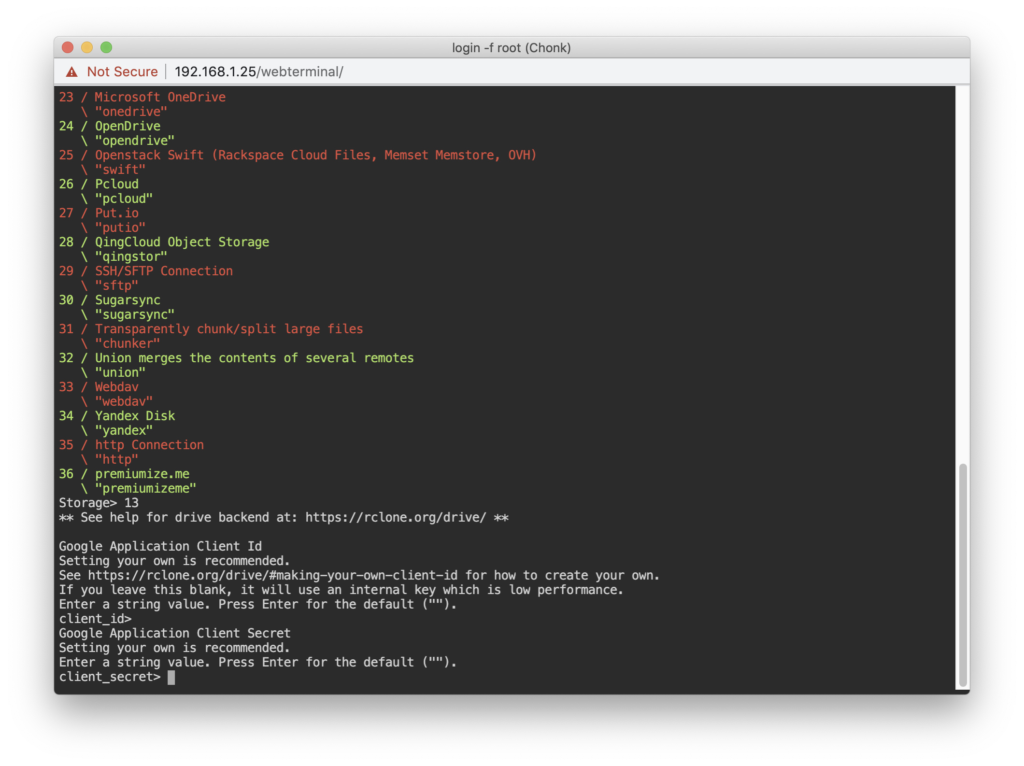
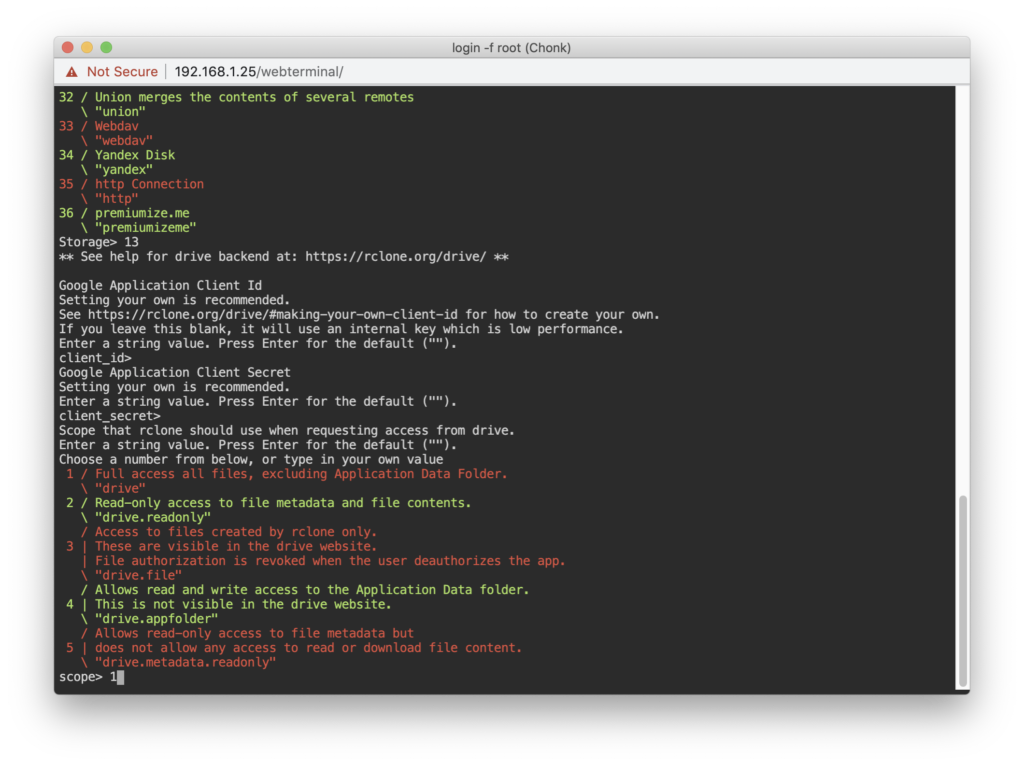
Next up, enter 1 for full drive access:
Now you’ll be asked about the root folder ID. While you can change this later, it’s easier to do now and we suggest creating a Shared drive. A Shared drive is really the key part of this; go create one and then capture the part of the URL that is the ID of this new Shared drive. Using a Shared drive is better than using a non-shared drive as you can add other users to this over time. Even if you don’t plan on that, trust us. To do this, head over to your GSuite Drive interface, click Shared drives, then:
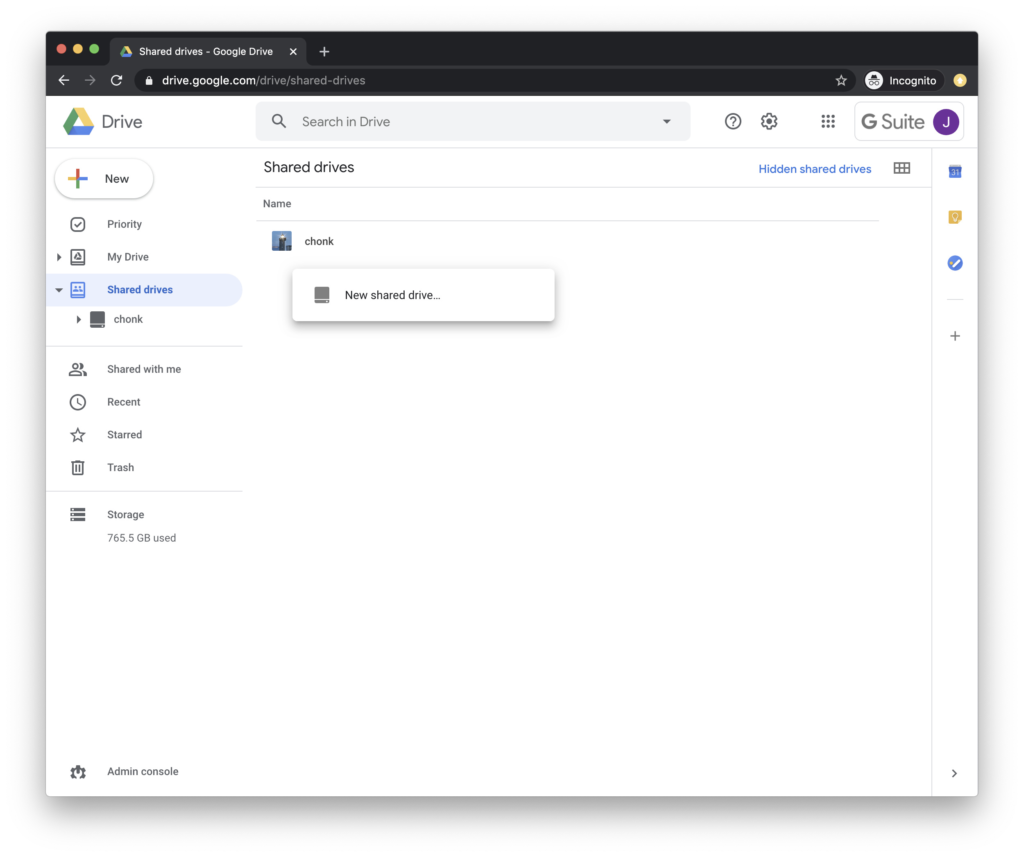

Our folder ID for root is 0AMvkxopx4FErUk9P. Enter yours when prompted.
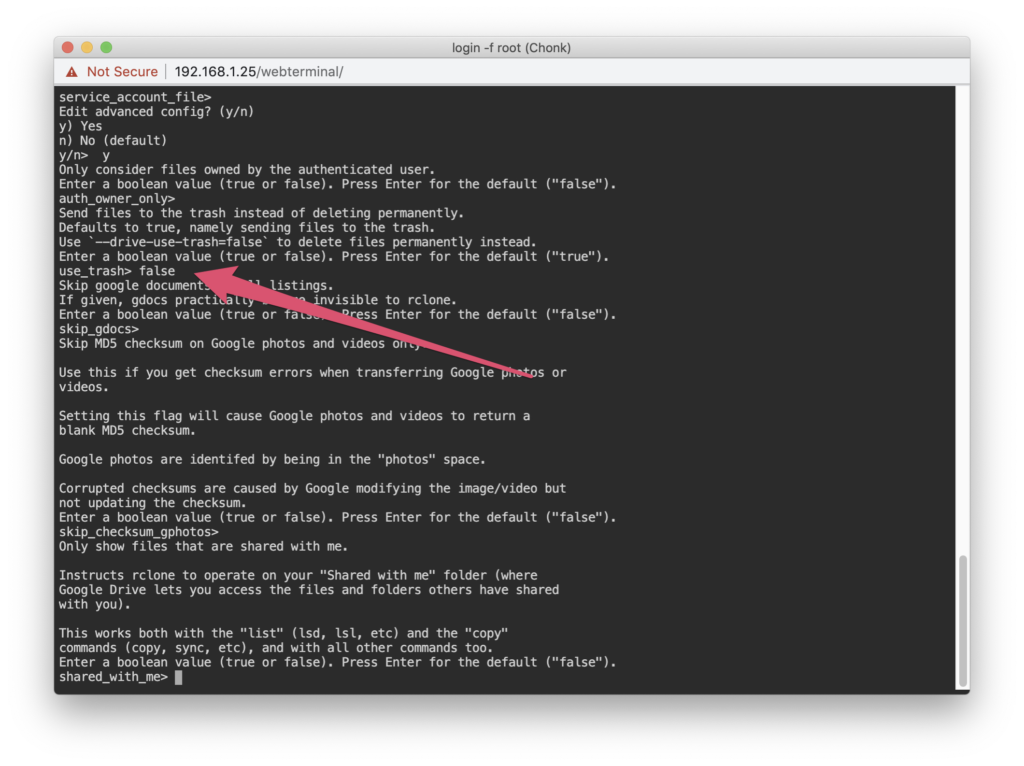
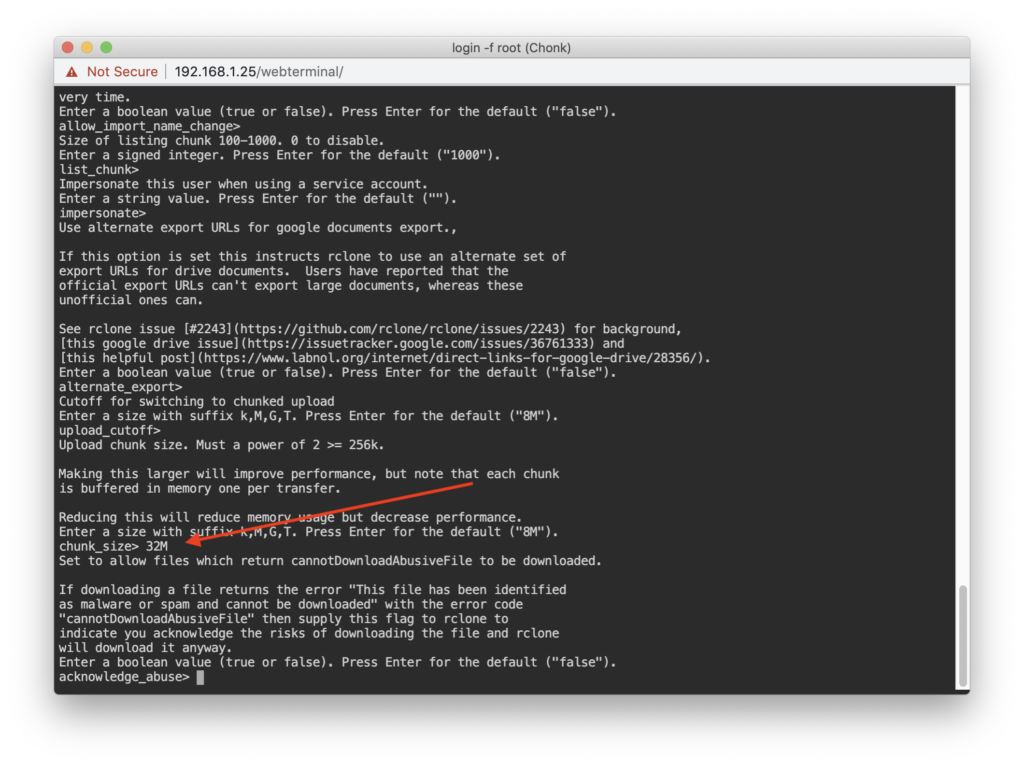
You can skip the Service Accounts question (just hit enter). Then press y to enter the advanced configuration. We’re going to make a few adjustments.
We want to disable (false) the user trash instead of deleting files. Whether copying or deleting a file, let’s just delete it instead of sending it to the trash:
The next adjustment is the chunk size to 32M instead of the default 8M:
Once done with that, you’ll be prompted about using the auto config and we’ll say yes, y.
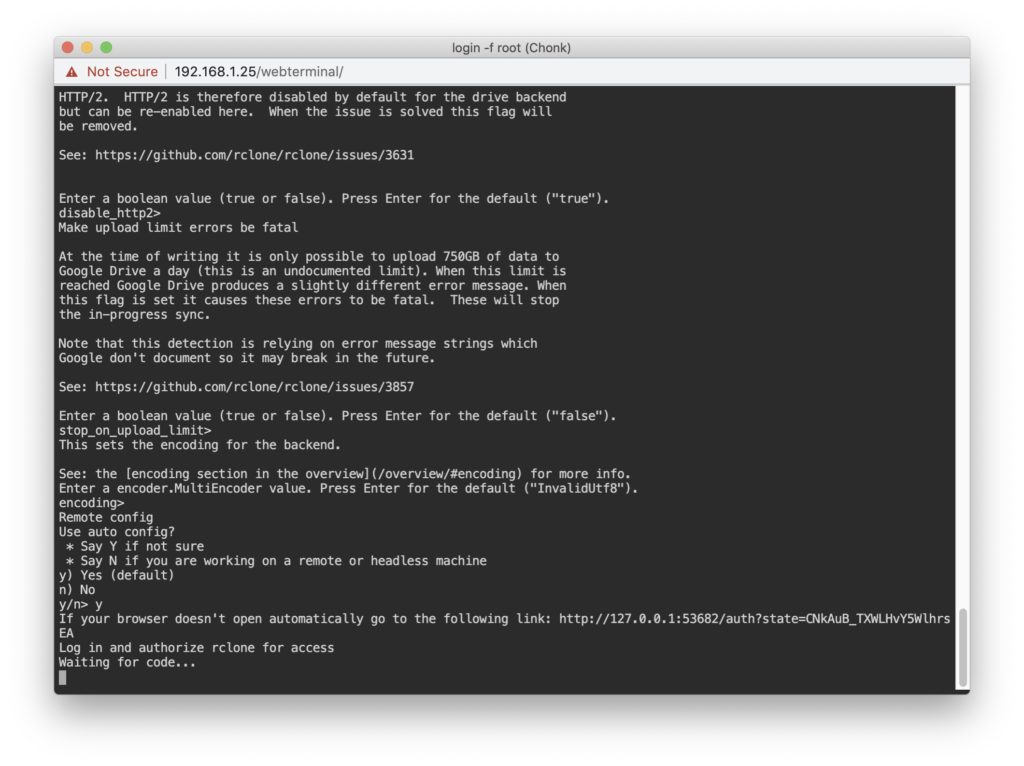
If you did not set rclone remotes outside of headless Unraid: Now, this will cause you downtime, sorry, but you must boot Unraid into GUI mode and be attached to it so you can authorize on localhost. In GUI mode, type in that URL into the browser directly on the Unraid machine and go through the authorization flow.
Once that is done, you’ll execute another series of commands:
rclone config
n
nas-secure
10
NASBackup:secure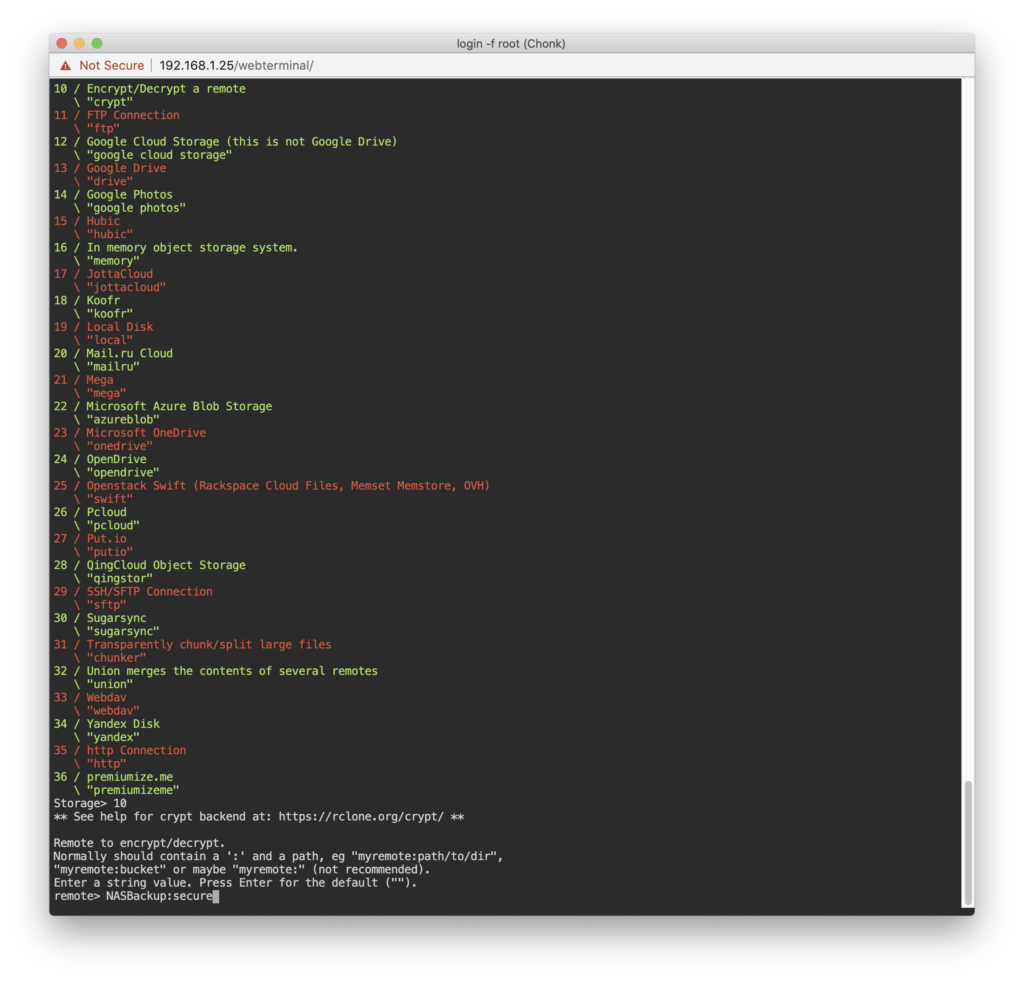
What we’ve done now is to config a new (n) remote called nas-secure and told rclone this is an encrypted folder 10 and gave it a path using our NASBackup remote destination as the root and a folder of secure as the full path NASBackup:secure.
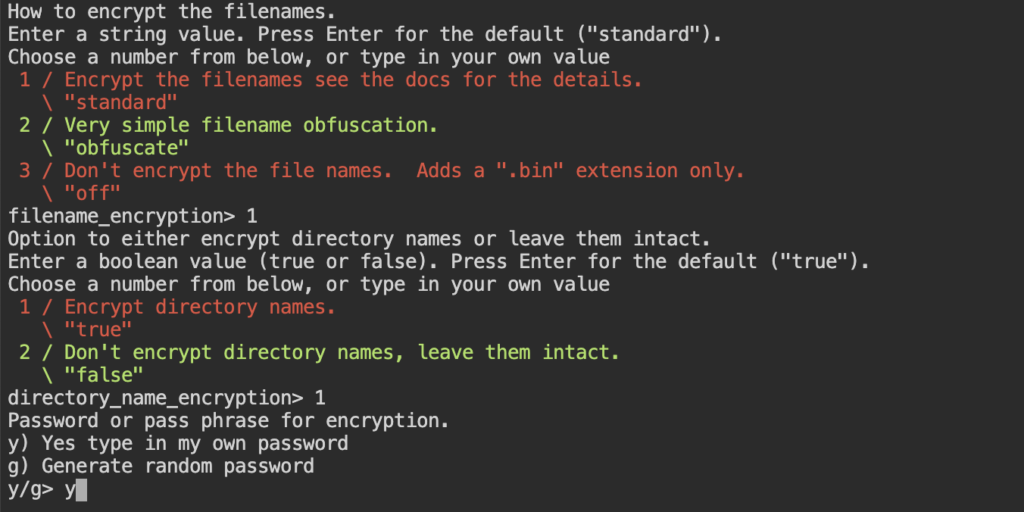
When prompted for encryption of filenames, select the option for full encryption, option 1 as of writing this guide. And encrypt the folder names. And set your own custom password & salt (and save in your password manager):
You’ll be asked if things look OK, confirm with y.
You’ve now configured your secure remote destination.
To test to make sure things worked, type rclone config and find one of your remotes we just set up and then type rclone lsd <remote>:secure to list the directories of that newly made remote.
Once you have rclone configured, you can verify by going to Unraid > Plugins and clicking rclone and seeing your populated dropdown:
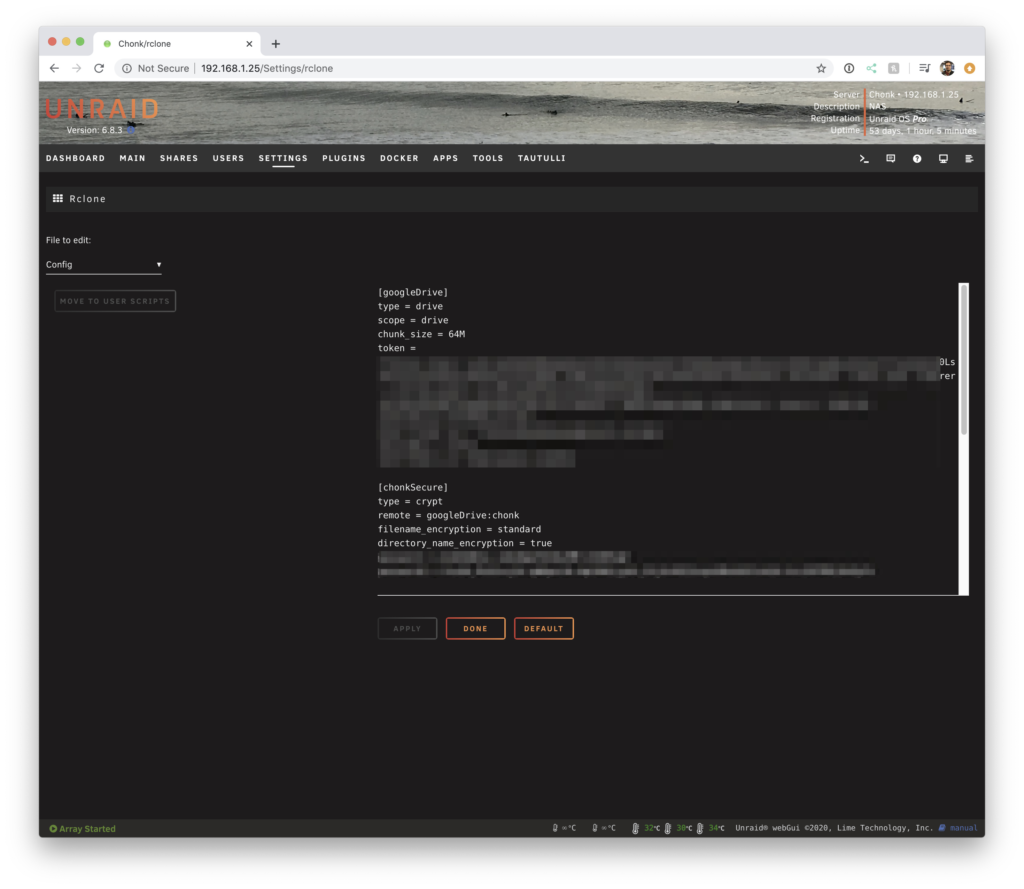
You’ll see that the config is made. Shown is a production system and how the base remote and secure remote are present. This is an important config file. If you want to mount your drives on any other system, you’ll use this config file. It is suggested to take this entire file in plain-text and store it in your password manager or another safe location. Without it, you will lose access to your encrypted data should your Unraid box get wiped, etc.
We’re getting close. Now we want to create Mount & Unmount scripts for our remote destinations. From the left dropdown in the rclone pluggin settings, go to each section and we’ll create two scripts. In these scripts, replace the remote drives with the ones you created earlier in this guide:

Remote Mount Script
In the rclone config page, you’ll see in the dropdown that you can select a Mount Script, go to it. Paste in the below, modify to your remote mount names you can see through rclone config. Then, save, and click “Move to User Scripts”
#!/bin/bash
#----------------------------------------------------------------------------
#first section makes the folders for the mount in the /mnt/disks folder so docker containers can have access
#you only need as many as what you need to mount for dockers or a network share

mkdir -p /mnt/disks/googleDrive
mkdir -p /mnt/disks/chonkSecure

#This section mounts the various cloud storage into the folders that were created above.

rclone mount --max-read-ahead 1024k --allow-other googleDrive: /mnt/disks/googleDrive &
rclone mount --max-read-ahead 1024k --allow-other chonkSecure: /mnt/disks/chonkSecure &
Remote Unmount Script
Do the same for the Unmount Script, including moving it to User Scripts.
#!/bin/bash
#----------------------------------------------------------------------------

fusermount -u /mnt/disks/googleDrive
fusermount -u /mnt/disks/chonkSecure
Mount/Unmount Automatically
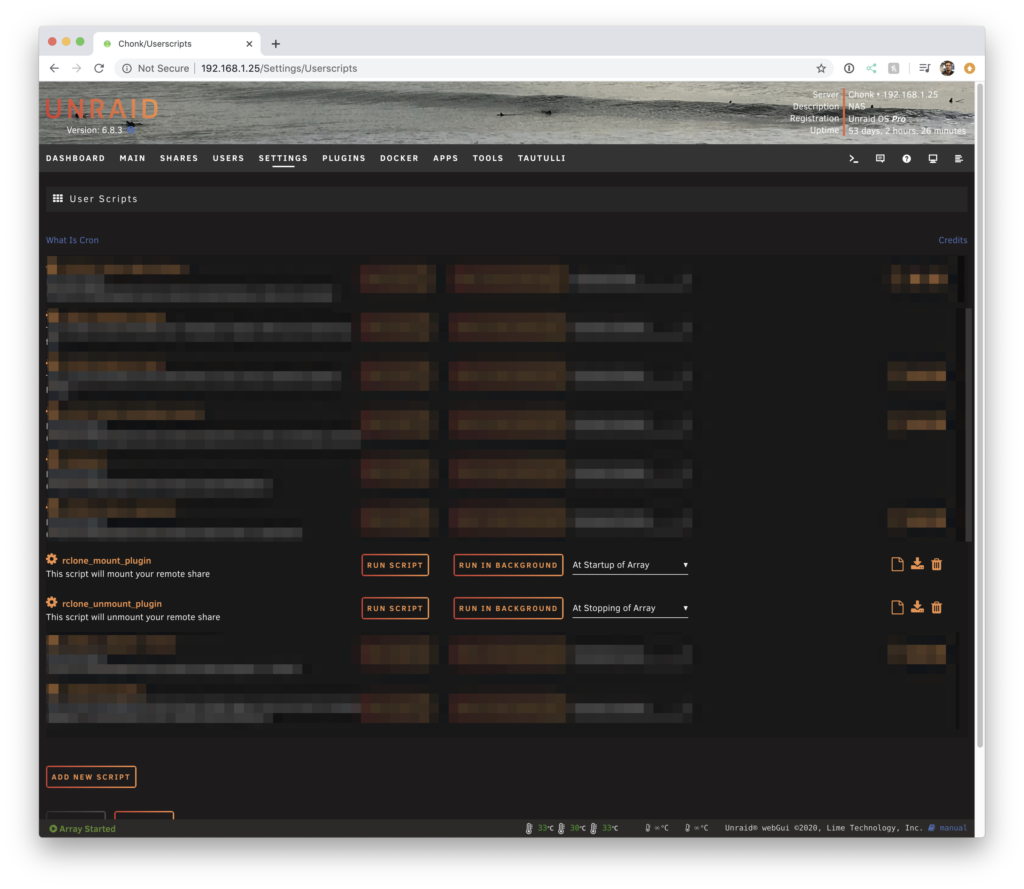
Navigate to Unraid > Settings > UserScripts and ensure you have the two unmount/mount scripts and that they have the right content. Then click “Run in Background” on the rclone_mount_plugin (or if you name it something else). This will mount your remote destinations to wherever you specified in the mount script. You can verify by doing an ls </mnt/disks/mounted-remote>. You can also drop a file into that directory and then ls it to verify it’s made it there.
Finally, on this User Scripts page, make sure your rclone_mount_plugin is run At Start of Array and your rclone_unmount_plugin is run At Stopping of Array. This ensures your mounts stay synced with your array, which is good practice.
You should test out the array start/stop and just make sure the mounts work right. Might as well. You’ve come so far.
Remote Backup Script
This is the last section that is required.
Head to the Unraid > User Scripts
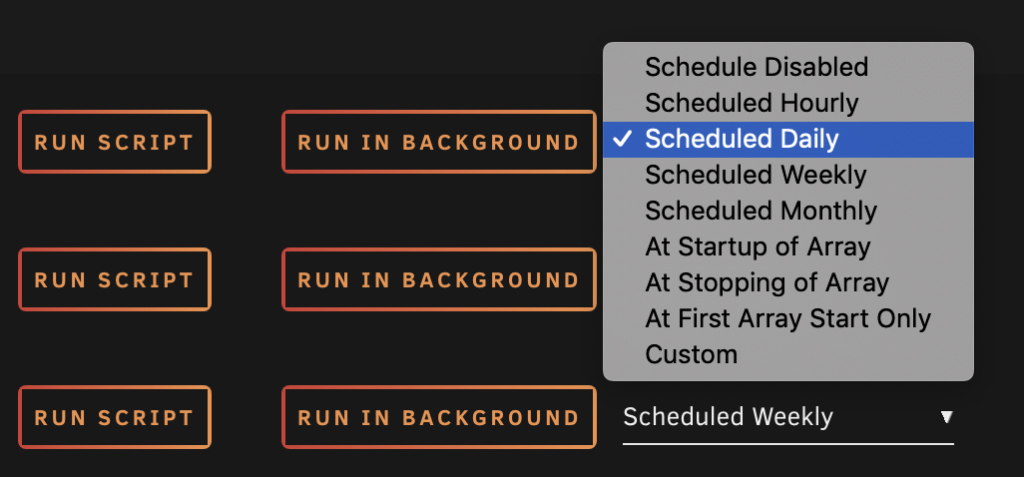
- “Add new script” called rclone_sync
- Important Set a schedule. How often you run this and some script settings are important to pay attention to. You will see comments in the script template concerning this.
- Add your script details (template below). You can specify sync of any source directory to remote destination. Read the script information below. And a word of caution: this script will log output but it is up to you to check those logs.
- Save
#!/bin/bash

CURRENT_DATE=$(date +%Y%m%d)

# The below file will be created or appended to for each
# for a given date. Ensure this destination folder exists
# and is writable
LOG_FILE=/mnt/user/appdata/app-logs/rclone-sync-$CURRENT_DATE.log

echo "Logging to $LOG_FILE"

# Max transfer for each rclone command called
# IMPORTANT: GSuite has a 750GB/day upload limit
# If you run multiple rclone commands below, make sure
# You take that into account
# For example: 5 sync run daily should each get 750GB/5 == ~150GB
# Set to 750GB because this template is only calling rclone once
MAX_TRANSFER=750G

# add this next line in for testing purposes
# --dry-run \

#######
# sync the Backups folder to GSuite
# For daily use
# "/mnt/user/Backups"
# Read documentation on what these (suggested) flags do
# https://rclone.org/flags/
#######
rclone sync -v \
--backup-dir=team-google-drive-encrypted:/OLD/Backups-$CURRENT_DATE \
--bwlimit=30M \
--fast-list \
--tpslimit=3 \
--log-file=$LOG_FILE \
--checkers=4 \
--transfers=2 \
--max-transfer=$MAX_TRANSFER \
/mnt/user/Backups team-google-drive-encrypted:/Backups

# Give us the ability to see the error in our ways
chmod a+r $LOG_FILE

echo "Log file can be found at $LOG_FILE"- backup-dir is worth noting; if your source (/mnt/user/Backups, in this case) is missing a file or has changed an existing file, rclone will delete the conflicting or missing file on your remote destination. Instead of deleting it for good, the backup-dir flag tells rclone to move that file to a specific folder. In our case, we have it moving to the /OLD/Backups-… folder. This is a cheap way to get versioning and we like it.
- A second reminder, read the script carefully. You can copy and paste the rclone sync command multiple times but make sure you set the global MAX_TRANSFER to something that when added across all command runs will not exceed 750GB in a single day.*
- It is suggested to run this script daily during off hours. By default, the Scheduled Daily User Scripts options will run sometime after midnight. You can specify a custom time to run using Cron. Here’s an easy cronjob schedule maker.
Try things out. You’re good to go now.
Remote Cryptcheck Script (Optional)
This is an optional section if you’d like to run another User Script at some interval to check that the content on your server and your remote match checksums. Read more at rclone-cryptcheck.
Head to the Unraid > User Scripts
- “Add new script” called rclone_cryptcheck
- Set a schedule. This is a very slow process so pick wisely.
- Add your script details (template below). You can specify in the script to check any directory at any level. Keep in mind, you can run multiple user scripts so you may decide to create one script running monthly for critical things and one running every quarter for less critical things. See #2 as a reminder that this is slow. And a word of caution: this script will log output but it is up to you to check those logs.
- Save
#!/bin/bash

CURRENT_DATE=$(date +%Y%m%d)
LOG_FILE=/mnt/user/appdata/app-logs/rclone-cryptchecker-$CURRENT_DATE.log
echo "Logging to $LOG_FILE"

# An example cryptcheck command.
# /mnt/user/Backups is your source on your NAS
# team-google-drive-encrypted:/Backups would be your rclone remote:folder
rclone cryptcheck -vv \
    --one-way --checkers=4 --log-file=$LOG_FILE \
    /mnt/user/Backups team-google-drive-encrypted:/Backups

chmod a+r $LOG_FILE

echo "Log file can be found at $LOG_FILE"
The End
If you like videos, you can follow a (slightly) outdated SpaceInvader1’s YouTube Video
If there is sufficient interest (comment in the thread), I can add details on how to mount these drives in Windows/Mac using rclone, and how to expose these mounted drives over SMB